블로그 글에 OpenGraph이미지 커스텀하기
2024-05-17
OpenGraph이미지를 동적으로 그리자!!

OpenGraph
OpenGraph프로토콜은 HTML문서에 추가할 수 있는 마크업으로, 콘텐츠의 맥락을 설명하며, 여러 미디어 플랫폼에서 URL이 공유될 때의 모습을 나타냅니다.
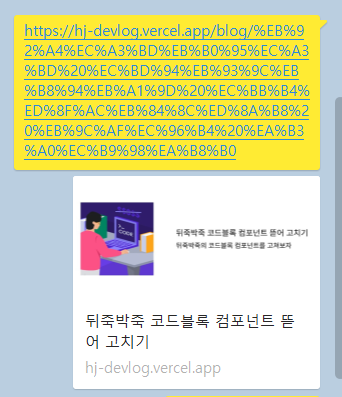
(카카오톡으로 공유했을 때 다음과 같이 OG의 내용이 보이게 됩니다)
OpenGraph에는 다음의 종류가 존재합니다.
<!--웹 페이지의 제목을 나타냅니다.-->
<meta name="og:site_name" content="효중 블로그" />

<!--웹 페이지의 설명을 나타냅니다.-->
<meta
  name="og:description"
  content="기계가 웹페이지를 효과적으로 이해할 수 있도록 사용하는 메타 태그에 대해서 알아보겠습니다."
/>

<!--웹 페이지의 주소를 나타냅니다.-->
<meta name="og:url" content="https://www.daleseo.com/html-meta" />

<!--웹 페이지의 썸네일을 나타냅니다.-->
<meta
  name="og:image"
  content="https://www.daleseo.com/html-meta/thumbnail.png"
/>
동적OG이미지
vercel은 Satori라는 SVG생성 라이브러리를 발표했습니다.요 라이브러리는 HTML,CSS의 조합을 SVG이미지로 만들어주고,해당 라이브러리를 바탕으로 커스텀한 OG이미지를 만들 수 있습니다.
Satori는 JSX문법,FlexBox,이미지를 지원하고 자동으로 텍스트에 대해 줄바꿈을 해줍니다.
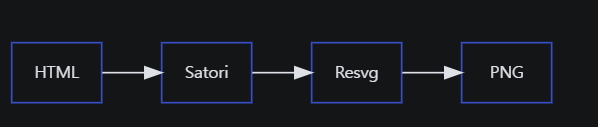
Satori-html은 HTML을 React Node형태로 변경하고, Resvg-js는 SVG를 PNG로 바꿉니다.
전체적인 흐름은 다음의 그림과 같습니다.
과거에는 헤드리스 브라우저를 실행해 생성된 카드의 스크린샷을 찍고 이를 메타태그로 참조하는 방법이 존재했습니다. (요 방법은 Next를 사용하지 않는 환경에서 사용할 수 있을 것 같습니다!)
Puppeteer라이브러리로 openGraph이미지 만들기
Next 13버전부터 opengraph-image라는 예약어 파일이 하나 생겼습니다. 다음과 같이 사용하게 되면 손쉽게 opengraph이미지를 만들 수 있습니다
import { ImageResponse } from 'next/server'
export default async function Image({ params }: { params: { id: string } }) {
  const url = `https://ha0.work/api/get/detail?id=${params.id}`;
  const post = await fetch(url).then((res) =>
    res.json()
  )

  return new ImageResponse(
    (
      <div
        style={{
          fontSize: 48,
          background: 'white',
          width: '100%',
          height: '100%',
          display: 'flex',
          alignItems: 'center',
          justifyContent: 'center',
        }}
      >
        {post.title}
      </div>
    ),
    {
      ...size,
    }
  )
}
저는 제 게시글을 공유했을 때, 해당 게시글이 무슨 내용인지 파악하기 쉽도록 블로그 게시글의 대표 이미지와,해당 게시글의 제목과 설명을 바탕으로 커스텀한 OG이미지를 만들어주고 싶었습니다.
발생한 문제점
블로그의 대표 이미지는 다음과 같은 <b>절대주소</b>형식으로 관리하고 있었습니다.

이런 상황에서 img태그에 src에 해당 경로를 넣었으나, 아래의 오류가 발생하였습니다. 또한, 블로그의 대표 이미지의 경우 크기가 제각각이기 때문에, <b>적당한 크기로 width,height를 변경하여</b>이미지 크기의 통일성을 주고 싶었습니다.
⨯ Error: Image source must be an absolute URL: /images/postImg/05_17.png
따라서 먼저 올바른 이미지의 경로를 넣어두고, 해당 이미지를 적절한 크기로 바꿔 최종적으로 OG에 추가하도록 하였습니다. 먼저 http나 https로 시작하는 절대경로를 반환하는 유틸을 만들어주었습니다.
//getCurrentBasePath.ts

export default function getCurrentBasePath() {
  if (process.env.NODE_ENV === 'production') {
    return process.env.NEXT_PUBLIC_PRODUCT_UR ?? '';
  }
  return process.env.NEXT_PUBLIC_LOCAL_URL ?? '';
}
그 후 이미지를 적절한 크기로 바꿔서(해당 부분은 sharp패키지를 사용하였습니다), base64의 형식으로 반환해주는 함수를 만들어 주었습니다.
import sharp from 'sharp';

import { get } from './axiosClient';
const convertRemoteImageToBase64 = async (
  url: string,
  width: number,
  height: number
) => {
  try {
    const inputBuffer = await get<Buffer>(url, {
      responseType: 'arraybuffer',
    });

    const outputBuffer = sharp(inputBuffer.data)
      .png()
      .resize({
        width,
        height,
        fit: 'cover',
      })
      .toBuffer();

    const outputBufferToBase64 = (await outputBuffer).toString('base64');

    return `data:image/png;base64,${outputBufferToBase64}`;
  } catch (e) {
    throw e;
  }
};

export default convertRemoteImageToBase64;
최종적으로는 다음과 같은 코드로 작성하였습니다.
//blog/[slug]/page.tsx

import { ImageResponse } from 'next/server';

import convertRemoteImageToBase64 from '@/utils/convertRemoteImagetoBase64';
import getCurrentBasePath from '@/utils/getCurrentBasePath';
import { getPostBySlug } from '~/lib/api';

export const size = {
  width: 1200,
  height: 630,
};

export const contentType = 'image/png';

export default async function Image({
  params,
}: {
  params: {
    slug: string;
  };
}) {
  const post = getPostBySlug(decodeURIComponent(params.slug), [
    'title',
    'data',
    'slug',
    'category',
    'excerpt',
    'date',
    'image',
  ]);

  const imageURL = decodeURIComponent(`${getCurrentBasePath()}${post.image}`);

  const getResizedImage = await convertRemoteImageToBase64(imageURL, 350, 350);

  return new ImageResponse(
    (
      <div
        style={{
          display: 'flex',
          zIndex: '99',
          width: '100%',
          height: '100%',
          background: 'white',
          justifyContent: 'space-around',
        }}
      >
        <img
          src={`${getResizedImage}`}
          style={{
            width: '350px',
            height: 'auto',
            objectFit: 'contain',
          }}
        ></img>
        <div
          style={{
            display: 'flex',
            flexDirection: 'column',
            justifyContent: 'center',
            alignItems: 'flex-start',
            padding: '0 20px',
          }}
        >
          <p
            style={{
              fontSize: '38px',
              fontWeight: 'bold',
              margin: '0 0 10px 0',
            }}
          >
            {post.title}
          </p>
          <p style={{ fontSize: '32px', margin: '0' }}>{post.excerpt}</p>
        </div>
      </div>
    ),
    {
      ...size,
      emoji:'twemoji'
    }
  );
}
다음과 같이 게시글의 제목,상세설명,대표이미지가 한 곳에 뭉쳐 게시글의 정보를 알아보기 쉬운 OG 이미지를 만들 수 있었습니다.