tanstackQuery딥다이브-1
tanstackQuery를 자세히 알아보기!-!
2024-05-28
먼저 tanstack-query를 사용하기 위해 QueryClientProvider로 앱을 감싸는 작업을 하게 됩니다.
// Provider.tsx
'use client';

import React from 'react';

import { QueryClientProvider, QueryClient } from '@tanstack/react-query';

type Props = {
  children: React.ReactNode;
};

function Providers({ children }: Props) {
  const [client] = React.useState(
    new QueryClient()
  );

  return <QueryClientProvider client={client}>{children}</QueryClientProvider>;
}

export default Providers;
QueryClientProvider
먼저 QueryClient를 살펴보겠습니다. 가장 먼저 보이는 부분은 QueryClientSharingContext와 getQueryClientContext가 반환한 Context으로 client를 자식에게 제공하고 있습니다.
export const QueryClientProvider = ({
  client,
  children,
  context,
  contextSharing = false,
}: QueryClientProviderProps): JSX.Element => {
  React.useEffect(() => {
    client.mount()
    return () => {
      client.unmount()
    }
  }, [client])

  const Context = getQueryClientContext(context, contextSharing)

  return (
    <QueryClientSharingContext.Provider value={!context && contextSharing}>
      <Context.Provider value={client}>{children}</Context.Provider>
    </QueryClientSharingContext.Provider>
  )
}
그럼 props으로 넘겨받은 client와 getQueryClientContext가 반환하는 값은 무엇일까요?
먼저 props로 받은 client의 타입을 통해 client가 어떤 것인지 알아보겠습니다.
type QueryClientProviderPropsBase = {
  client: QueryClient
  children?: React.ReactNode
}

export interface ContextOptions {
  /**
   * Use this to pass your React Query context. Otherwise, `defaultContext` will be used.
   */
  context?: React.Context<QueryClient | undefined>
}
props의 client는 QueryClient로 받아오는 것을 볼 수 있습니다.또한 context는 QueryClient의 인스턴스를 값으로 가지는 React의 Context임을 알 수 있습니다.
그럼 getQueryClientContext함수를 살펴볼까요?
만약 context가 전달되면, 바로 context를 반환합니다. window객체가 존재하는 경우(클라이언트 사이드 환경의 경우), 전역 window객체에 컨텍스트를 저장하고 반환을 하고 있어요
그렇지 않을 경우에는 기본적으로 정의된 defaultContext를 반환합니다.
function getQueryClientContext(
  context: React.Context<QueryClient | undefined> | undefined,
  contextSharing: boolean,
) {
  if (context) {
    return context
  }
  if (contextSharing && typeof window !== 'undefined') {
    if (!window.ReactQueryClientContext) {
      window.ReactQueryClientContext = defaultContext
    }

    return window.ReactQueryClientContext
  }

  return defaultContext
}
QueryClientProvider는 한마디로 정의해보자면, QueryClient를 어디서나 사용하게 만들어주는 컴포넌트입니다.
QueryClient
그럼 QueryClient는 무엇일까요?
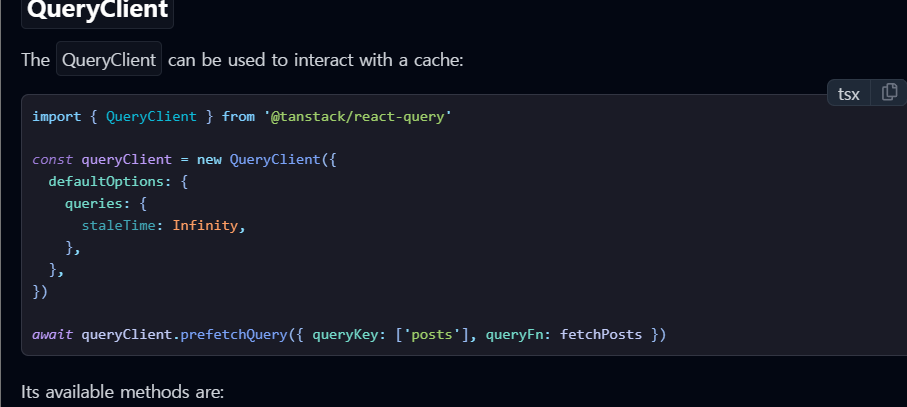
공식문서에서 QueryClient를 다음과 같은 문구로 소개하고 있습니다.

QueryClient는 cache와 상호작용한다고 되어있어요! QueryClient의 구현부에서도 이와 같은 cache와 상호작용하는 여러부분이 보입니다.
먼저 QueryClient의 constructor부분을 살펴보겠습니다
constructor(config: QueryClientConfig = {}) {
    this.queryCache = config.queryCache || new QueryCache()
    this.mutationCache = config.mutationCache || new MutationCache()
    this.defaultOptions = config.defaultOptions || {}
    this.queryDefaults = []
    this.mutationDefaults = []
    this.mountCount = 0
}
queryCache와, mutationCache가 보이네요. QueryClient객체가 만들어 질 때 queryCache와 mutationCache가 하나씩 생성되는 것을 볼 수 있어요.
그럼 queryCache와 mutationCache의 구현부를 찾아가 봅시다!
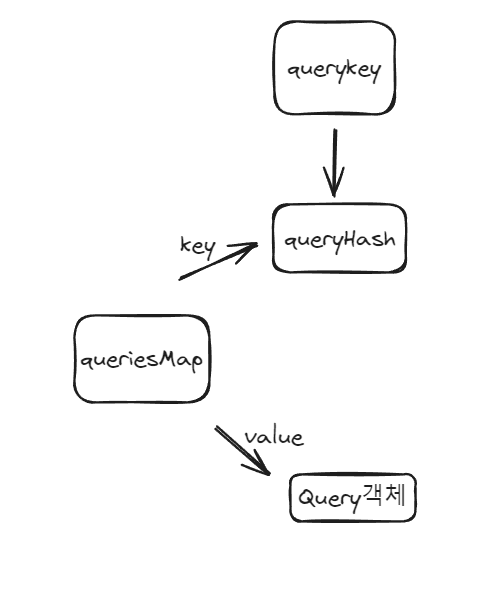
queryCache는 먼저, queries, queriesMap 두 개를 갖고 있어요. queries는 query들을 모아놓은 배열이고, queriesMap은 queryKey를 통해 query를 저장한 객체입니다.
queriesMap은 쿼리키로 만들어진 queryHash를 키로서 관리하게 됩니다.그리고 값에는 쿼리객체가 들어갑니다.

주요 함수부터 하나씩 살펴보겠습니다. 먼저 queryCache의 빌드 함수입니다.
먼저 options.queryKey를 이용해 쿼리 키를 얻습니다. 그리고 options.queryHash가 제공되지 않은 경우 hashQueryKeyByOptions를 사용하여 해시 값을 만듭니다.
만약 해당 해시 값으로 찾을 수 있는 쿼리가 있다면(queriesMap[queryHash]) 바로 해당 쿼리를 반환하고, 그렇지 않으면 새로운 쿼리를 생성해 추가해줍니다.
build<TQueryFnData, TError, TData, TQueryKey extends QueryKey>(
  client: QueryClient,
  options: QueryOptions<TQueryFnData, TError, TData, TQueryKey>,
  state?: QueryState<TData, TError>,
): Query<TQueryFnData, TError, TData, TQueryKey> {
  const queryKey = options.queryKey!
  const queryHash =
    options.queryHash ?? hashQueryKeyByOptions(queryKey, options)
  let query = this.get<TQueryFnData, TError, TData, TQueryKey>(queryHash)

  if (!query) {
    query = new Query({
      cache: this,
      logger: client.getLogger(),
      queryKey,
      queryHash,
      options: client.defaultQueryOptions(options),
      state,
      defaultOptions: client.getQueryDefaults(queryKey),
    })
    this.add(query)
  }

  return query
}
다음으로 queryCache의 add함수입니다. 만약 queriesMap에 query가 없다면 queriesMap에 쿼리를 넣어주고, queries배열에 새 쿼리를 추가해줍니다. 그리고 마지막으로 notify함수를 호출하네요
 add(query: Query<any, any, any, any>): void {
    if (!this.queriesMap[query.queryHash]) {
      this.queriesMap[query.queryHash] = query
      this.queries.push(query)
      this.notify({
        type: 'added',
        query,
      })
    }
  }
마지막 주요 함수로 notify가 있는데 살펴보겠습니다. notifyManager의 batch함수를 사용하고 있고, this.listeners배열을 순회하면서 각 리스너에게 이벤트를 전달하고 있네요!
notify(event: QueryCacheNotifyEvent) {
    notifyManager.batch(() => {
      this.listeners.forEach(({ listener }) => {
        listener(event)
      })
    })
}
결국 queryCache를 한마디로 정리해보면,아래의 이미지와 같습니다

queryClient는 이 queryCache를 이용해 여러 작업을 하게 됩니다. 예를 들어, queryCache를 사용하는 getQueryData함수를 볼까요?
getQueryData<TQueryFnData = unknown>(
    queryKey: QueryKey,
    filters?: QueryFilters,
  ): TQueryFnData | undefined {
    return this.queryCache.find<TQueryFnData>(queryKey, filters)?.state.data
}
queryClient.getQueryData 메서드는 기존 쿼리의 캐싱 된 데이터를 가져오는 데 사용할 수 있는 동기 함수입니다. 쿼리가 존재하지 않으면 undefined를 반환하게 되는데 이 과정에서 queryCache.find함수를 내부적으로 사용합니다.
QueryObserver
쿼리옵저버는 여러 쿼리의 상태를 감시하고, 관리하는 기능을 수행합니다. Observer는 useQuery를 호출할 때 만들어집니다(useQuery와 1대1 대응)
무조건 하나의 쿼리를 구독하고, 하나의 쿼리를 알려면 queryKey가 필요합니다.
const observer = new QueryObserver(queryClient, { queryKey:['posts'] }
import { notifyManager } from './notifyManager'
import { focusManager } from './focusManager'
import { Subscribable } from './subscribable'
import { fetchState } from './query'

export class QueryObserver<
  TQueryFnData = unknown,
  TError = DefaultError,
  TData = TQueryFnData,
  TQueryData = TQueryFnData,
  TQueryKey extends QueryKey = QueryKey,
> extends Subscribable<QueryObserverListener<TData, TError>>
위에서 Subscribable을 가져와서 확장을 하고 있습니다. 저 Subscribable가 뭔지 알아보겠습니다. 그리고 notifyManger,focusManger을 가져오는데 이게 뭔지 하나씩 살펴보겠습니다
Subscribable의 코드는 다음과 같습니다. 옵저버 패턴의 구독, 구독 해지 기능을 제공하며 , 이벤트 리스너를 추가하고 제거하는 기능을 관리합니다.
type Listener = () => void

export class Subscribable<TListener extends Function = Listener> {
  //현재 구독된 리스너들을 저장하는 Set이다.
  //중복된 리스너의 추가를 막아준다.
  protected listeners: Set<TListener>

  //리스너들을 저장할 set을 초기화
  constructor() {
    this.listeners = new Set()
    this.subscribe = this.subscribe.bind(this)
  }

  //리스너가 추가되면 onSubscribr메서드를 호출해준다.
  subscribe(listener: TListener): () => void {
    this.listeners.add(listener)

    this.onSubscribe()

    //반환값으로 리스너를 제거해주고 onUnsubscribe를 호출하는 함수 혼
    return () => {
      this.listeners.delete(listener)
      this.onUnsubscribe()
    }
  }
  //현재 구독된 리스너가 있는지 여
  hasListeners(): boolean {
    return this.listeners.size > 0
  }

  protected onSubscribe(): void {
    // Do nothing
  }

  protected onUnsubscribe(): void {
    // Do nothing
  }
}
다음으로 queryObserver에서 사용하는 notifyManger부분을 살펴보겠습니다.
이 notifyManager는 콜백에 대해 스케쥴링, 일괄처리 기능을 제공합니다.
주요 함수들 먼저 살펴보겠습니다.
notifyManager.batch는 전달된 콜백 내에 예약된 모든 업데이트를 배치 처리하는데 사용됩니다.
주로 queryClient 업데이트를 최적화 하기 위해 내부적으로 사용됩니다.
function batch<T>(callback: () => T) : T
notifyManager.batchCallsbatchCalls는 콜백을 받아 이를 래핑하는 고차 함수입니다. 래핑된 함수에 대한 모든 호출은 다음 배치에서 콜백을 실행하도록 예약합니다.
type BatchCallsCallback<T extends Array<unknown>> = (...args: T) => void

function batchCalls<T extends Array<unknown>>(
  callback: BatchCallsCallback<T>,
): BatchCallsCallback<T>
notifyManager.scheduleschedule은 다음 배치에서 실행될 함수를 예약합니다. 기본적으로, 배치는 setTimeout을 사용하여 실행되지만, 이는 설정을 통해 변경할 수 있습니다.
function schedule(callback: () => void): void
notifyManager.setNotifyFunctionsetNotifyFunction은 알림 함수를 오버라이드합니다. 이 함수는 실행되어야 할 콜백을 전달받습니다. 기본 notifyFunction은 단순히 이를 호출합니다.
예를 들어, 테스트를 실행하는 동안 알림을 React.act로 래핑하는 데 사용될 수 있습니다:
import { notifyManager } from '@tanstack/react-query'
import { act } from 'react-dom/test-utils'

notifyManager.setNotifyFunction(act)
notifyManager.setBatchNotifyFunctionsetBatchNotifyFunction은 일괄 업데이트에 사용할 함수를 설정합니다.
프레임워크가 사용자 정의 배치 함수를 지원한다면, notifyManager.setBatchNotifyFunction을 호출하여 TanStack Query에 알릴 수 있습니다.
예를 들어, solid-query에서 배치 함수가 설정되는 방법은 다음과 같습니다:
import { notifyManager } from '@tanstack/query-core'
import { batch } from 'solid-js'

notifyManager.setBatchNotifyFunction(batch)
notifyManager.setSchedulersetScheduler는 다음 배치가 실행될 때 스케줄링할 사용자 정의 콜백을 구성합니다. 기본 동작은 setTimeout(callback, 0)입니다.
import { notifyManager } from '@tanstack/react-query'

// 다음 마이크로태스크에서 배치를 스케줄링
notifyManager.setScheduler(queueMicrotask)

// 다음 프레임이 렌더링되기 전에 배치를 스케줄링
notifyManager.setScheduler(requestAnimationFrame)

// 미래의 어느 시점에서 배치를 스케줄링
notifyManager.setScheduler((cb) => setTimeout(cb, 10))
이 notifyManager는 싱글톤 형식으로 클로저를 관리하고 notifyManger를 이용해 이벤트를 서로에게 알리는 역할을 합니다.
A라는 컴포넌트에서 useQuery로 key:todo이런식으로 사용하고 B라는 컴포넌트에서 useQuery를 써서 key:todo(즉, 동일한 key를 사용할 때),queryObserver객체가 2번 생성되고, 이 queryObserver와 Query,QueryClient간의 공유는 notifyManager에 의해 이루어지게 됩니다
다음글에서는 query객체,query객체와 queryObserver, query객체와 queryObserver의 관계에 대해서 작성해보겠습니다!